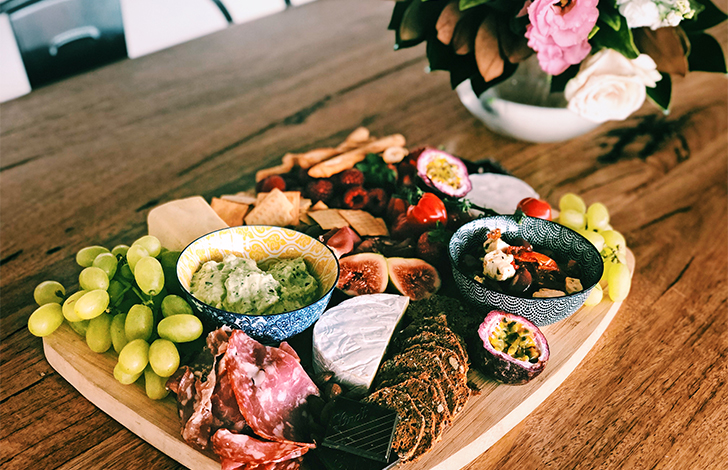

How To Make The Perfect Food Platter
Your guide to creating an Instagrammable platter.
Ah food platters – the perfect addition to a party, family gathering or as a casual Tuesday night dinner when you’re too lazy to cook but still want to feel a little fancy. Figuring out what to put on your food platter and how to make it worthy of an Instagram post can be overwhelming, but in reality, creating a delicious and beautiful platter is really simple.
Start with the board
The most important step for any platter, whether it be a cheese platter, fruit platter or both, is to start with a good base. You don’t need anything fancy – a large chopping board is fine – however you need to ensure the platter is large enough to fit all your food but not too large that there will be blank spaces.
Food groups for the perfect platter
A successful food platter is all about having a range of different items. Try to have at least four of the following groups on your platter, but we find that one or two items from each group also works well. We’ve popped a checklist below with some suggestions of perfect food items from each group:
- Dairy – include a at least three cheeses on your platter, using different kinds to keep it interesting.
- Fresh – think strawberries, watermelon, peaches and cherry tomatoes. You can add any seasonal produce that will add some colour and freshness to your platter
- Meat – hit up your deli and grab a few kinds of meat. Be mindful of your audience here and don’t buy only spicy meats if you have someone intolerant to heat.
- Antipasto / dips – we love to add a chunky dip, hummus and some olives.
- Bakery – include a range of beautiful artisan crackers, fresh sourdough bread and water crackers
- Dried / nuts – any kind of nut works but our favourites are almost or pistachios
- Sweet – break up your favourite chocolate block and scatter it on the platter. If you need to be more child friendly, use chocolate covered pretzels or chocolate covered sultanas.
Preparation is KEY
Usually when you’re making a food platter, it is for an event like a dinner party, a gathering or a picnic. The last thing you want to be doing on the day of the event is to be cutting cheese and slicing meats. A great tip is to prepare all your meats, hard cheeses and antipasto bits the night before.
Pre-roll all your meats and pre-cut any hard cheeses and store them in an airtight container, like our Daily Cube containers. You can also put all antipasto items in their bowls and cover them with cling wrap or bees wax wraps and pop them in the fridge until you are ready to platter.
Putting the food platter together
Ok, now onto how to actually put your platter together.
Always start with the things that take up the most room on the food platter – everything else can squeeze in later. We like to start with little bowls for your antipasto additions.
You can skip the bowls but we find that it adds more height and depth to the platter. It’s also good for food intolerances or people who really hate it when the olive juice touches their cheese (there is nothing worse!)
Once you’ve placed the antipasto bowls at varying spots on the platter, move onto your cheese. Soft cheeses can be kept whole and you can scatter your pre-cut hard cheeses around the platter in small bunches. Ideally, cheese should be served at room temperature so if you are serving your platter straight away make sure you take the cheese out of the fridge at least 30 minutes before starting.
Once you are happy with the placement of your cheese, start to fill the gaps with your meat. Take your pre-rolled meat and place on the food platter. There is no real art to this, the more random the better. If you have vegetarian or vegan dietaries, you can place all the meat on one side of the platter or leave it off entirely and full your platter with more fruit and antipasto.
Next comes the crackers and bread. Because we want the platter to primarily be about the cheese, try not to overwhelm your platter with crackers. Use a few handfuls of your chosen carb and place them around the edges of the platter so they are easy to grab. The rest can go in a bowl next to your platter so you can easily refill.
Now it’s time for everything else! This is where you get to have fun and add the WOW factor. Fill any blank spots on the platter with your colour elements – the fresh produce and dried fruit. As well as adding some colour, this helps add balance.
Next, scatter nuts and sweet elements in any final small spaces. We’re almost done!
The final step is to add garnish for a truly Instagrammable platter. You can use anything here, but we always opt for something green to keep it looking fresh. Try a few leaves of rocket or some herbs – whatever you have on hand!
TA-DA! You are officially a platter queen. Pour yourself a wine and tuck in.
To create the perfect party platter, try to include 2 – 3 from the categories below. We find it best to use four of the categories for a varied platter.
Cheese:
- Brie
- Blue cheese
- Bocconcini
- Goat cheese
- Cream cheeses; chilli, apricot, chives
- Camembert
- Chedder
- Gruyere
- Gouda
- Edam
- Halloumi
- Feta
Fresh:
- Apricot
- Cherry Tomao
- Blueberries
- Fresh figs
- Grapes
- Capsicum
- Carrot
- Celery
- Cherries
- Peaches
- Strawberries
- Raspberries
- Watermelon
Meat:
- Chorizo
- Ham
- Kabana
- Salami
- Serrano
- Pancetta
- Prosciutto
- Mortadella
- Twiggy Sticks
Antipasto / dips
- Quince paste
- Olives
- Pickled onions
- Stuffed peppers
- Pesto dip
- Hummus
- Tzatziki dip
- French onion dip
- Other homemade dip varieties
- Pickles
Bakery:
- Water crackers
- Gourmet biscuits and crackers
- Mini toast
- Rice crackers
- Bread twists
- Fresh bread
Dried/nuts:
- Dried apple
- Almonds
- Pistachio
- Dried apricots
- Hazelnuts
- Cashews
- Dried fig
- Macadamia
- Dried dates
Sweet:
- Dark or milk chocolate
- Chocolate covered nuts
- Chocolate covered sultanas
- Chocolate covered pretzels


Leave a Reply